Filter-Cap: Difference between revisions
From Bioblast
No edit summary |
|||
| Line 4: | Line 4: | ||
|product type=O2k, MultiSensor, O2k-Fluorescence LED2-Module | |product type=O2k, MultiSensor, O2k-Fluorescence LED2-Module | ||
|info=[[O2k-Fluorescence LED2-Module]] | |info=[[O2k-Fluorescence LED2-Module]] | ||
|product image=[[ | |product image=[[Image:Filter-Cap.JPG|180px|right|link=http://www.bioblast.at/index.php/Filter-Cap]] | ||
}} | }} | ||
__TOC__ | __TOC__ | ||
Revision as of 14:11, 13 November 2013

![]()


Filter-Cap

| Description | Filter-Cap: Each Fluorescence-Sensor Green and Fluorescence-Sensor Blue is equipped with a removable Filter-Cap for exchange of optical filters, which is possible independently for optical pathways from the LED and to the photodiode. |
|---|---|
| Product ID | 44310-01 |
| Type | O2k, MultiSensor, O2k-Fluorescence LED2-Module |
| Link | O2k-Fluorescence LED2-Module |
| Image | 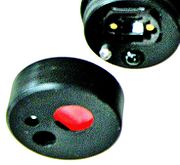 |
O2k-Guide
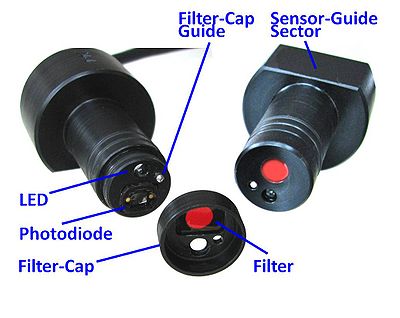
Mounting a Filter-Cap
The Filter-Cap of each sensor can be exchanged for application of different filter combinations on the same optical sensor. See Application specific settings to select a filter set.
- Dismounting: Pull the Filter-Cap straight from the sensor. The Filter-Cap Guide prevents rotational movements.
- Inserting /replacing filters: Remove all filters and store them in the properly labeled filter box for this filter set. Insert the filters form the selected filter set: The round filters of each filter set fit to the round window of the filter cap and cover the LED, the rectangular filters fit into the rectangular window of the filter cap and cover the photodiode.
- Mounting: Hold sensor and filter cap in a vertical position above you. Align the Filter-Cap with the Filter-Cap Guide (small steel rod) protruding from the sensor. Press the Filter-Cap onto the sensor without rotational movements.
O2k-Guide: Setup - next step Connect Fluorescence-Sensor to O2k