Difference between revisions of "Smart Fluo-Sensor Green"
From Bioblast
| Line 17: | Line 17: | ||
'''O2k-Guide: Setup - next step [[Filter-Cap#Mounting_a_Filter-Cap|Mounting a Filter-Cap]]''' | '''O2k-Guide: Setup - next step [[Filter-Cap#Mounting_a_Filter-Cap|Mounting a Filter-Cap]]''' | ||
=== Connect | === Connect Smart Fluo-Sensor to O2k (series H only) === | ||
:::: | :::: Connect the Smart Fluo-Sensor cable to the Fluo plug, insert the male plug of the cable into the female Fluo plug. The red dot on the male plug faces straight upwards. Each Smart Fluo-Sensor can be used on O2k-Chamber A or B. The blue frame of the chamber window and the Smart Fluo-Sensor are specially designed to only connect at a specific orientation, when the unbowed notches align. In this optimal position, the Smart Fluo-Sensor is carefully inserted in the window opening until the sensor completely and gapless covers the chamber window. In this position, the cable routing must be horizontal. | ||
:::: | :::: To remove the Sensor, carefully pull out the Smart Fluo-Sensor while slightly turning. Do not pull on the cable! | ||
=== Stoppers === | === Stoppers === | ||
:::: Use only [[Stopper\black PEEK\conical Shaft\central Port|black PEEK stoppers]] in conjunction with fluorometric measurements | :::: Use only [[Stopper\black PEEK\conical Shaft\central Port|black PEEK stoppers]] in conjunction with fluorometric measurements. The black stoppers can be used for all HRFR applications in general. See [[MiPNet22.11_O2k-FluoRespirometer_manual]] for calibration of the O2k-chamber volume. | ||
<!-- '''O2k-Guide: [[Fluorescence-Control_Unit#O2k-Guide|Electronic settings]]''' --> | |||
[[Category:Technical service]] | [[Category:Technical service]] | ||
Revision as of 12:49, 25 July 2017
Smart Fluo-Sensor Green
| Description | Smart Fluo-Sensor: LED with specified wavelength, photodiode, Filter-Cap attached with specific optical filter for the LED and/or photodiode. See Smart Fluo-Sensor Green and Smart Fluo-Sensor Blue. Smart Fluo-Sensors are precalibrated with sensor-specific memory and direct input into DatLab 7. |
|---|---|
| Product ID | xxx |
| Type | O2k-FluoRespirometer, O2k-Module |
| Link | <--!>> More details? Consult O2k-Fluo LED2-Module--> |
| Image |
O2k-Guide
Select the Smart Fluo-Sensors
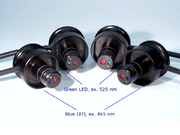
- Switching between different excitation wavelengths and filters is achieved by simply exchanging the Smart Fluo-Sensors. Two types of optical sensors are supplied with different LEDs for fluorescence excitation, and the effective spectra of the LEDs are modified by filters.
- Select the fluorescence sensor and filter set form the table on application-specific settings. Each fluorescence sensor is delivered with a mounted filter set:
- Fluorescence-Sensor Green: 525 nm. The installed Filter-Cap is ready for H2O2 measurement with Amplex® UltraRed.
- Fluorescence-Sensor Blue: 465 nm. The installed Filter-Cap is ready for measurements of mt-membrane potential with safranin. A different filter is used for measurement with Magnesium green® or Calcium green® .
O2k-Guide: Setup - next step Mounting a Filter-Cap
Connect Smart Fluo-Sensor to O2k (series H only)
- Connect the Smart Fluo-Sensor cable to the Fluo plug, insert the male plug of the cable into the female Fluo plug. The red dot on the male plug faces straight upwards. Each Smart Fluo-Sensor can be used on O2k-Chamber A or B. The blue frame of the chamber window and the Smart Fluo-Sensor are specially designed to only connect at a specific orientation, when the unbowed notches align. In this optimal position, the Smart Fluo-Sensor is carefully inserted in the window opening until the sensor completely and gapless covers the chamber window. In this position, the cable routing must be horizontal.
- To remove the Sensor, carefully pull out the Smart Fluo-Sensor while slightly turning. Do not pull on the cable!
Stoppers
- Use only black PEEK stoppers in conjunction with fluorometric measurements. The black stoppers can be used for all HRFR applications in general. See MiPNet22.11_O2k-FluoRespirometer_manual for calibration of the O2k-chamber volume.


